• Help Support The Rugby Forum :

Using Blender to add custom player faces to Rugby 08

I use a mix of Blender and GIMP for texture editing, it's obviously easier to visualise where the texture will go when painting in Blender, but I find it easier to add finer details in GIMP.


I'll uploal DVDM in the other thread in a bit.

Another request as I'm less familiar with southern hempsphere players, is this a good match for Richie Mo'unga?:
View attachment 11030


Yep I think looking at the Watson I did in the close ups it does need some fixing so GIMP probably still good for finer details

Here is the Mo'unga I have had left used for a while as it was one of the first ones I did so I had mucked a lot of the model up. Found it quite difficult. I really like the hair model on yours and the head model is way cleaner than mine - think the face texture likeness maybe isn't as good as some of the other ones you've done but still think he looks good


As a side note have you ever tested a 2048 PNG and/or high poly face in game? I tried with a Jonny May I did and it seems to work ok in kick off but crashes on first world cup game for some reason. I've got three other heads left and two are high poly (Mo'unga and Jalibert) - not sure if it is worth doing them as they are not the best and I guess might also crash the game. Have you experienced a similar issue.

Only low poly player I have left is Henry Slade and I mucked up his eye so head model looks strange - will finish that off now and then look into facebuilder
 
Here's my first upload of custom player heads. I've included in the file a text document of the reference numbers to add these players to a roster file using Woosah's editor, and my own roster file which should work with the TRF 20-21 mod. I'm still working on a couple of other players right now (I can't get Hogg and Farrell to look right), and have been focusing mostly on Wales/Lions candidates so far.

The roster file will allow these to be used in most game modes, but not World League. Also there are some duplicate plaers popping up in this roster (North's head is on someone in the SA squad as well).


I just realised I don't think Jon Davies is in the zip folder - would you be able to upload? I'm putting together a folder of all the players so far
 
I've done the head model for Teddy Thomas and borrowed the hairr model from Tana Umaga, I'm not sure how best to make a suitable har model for him, would this be ok to upload his as-is?

Untitled.png
 
I've done the head model for Teddy Thomas and borrowed the hairr model from Tana Umaga, I'm not sure how best to make a suitable har model for him, would this be ok to upload his as-is?

View attachment 11237

I had a quick look just now at Lote Tuqiri as another option but looks like it may well be the same hair model. Also tried Seru Rabeni with no luck. Not sure there would be many players that tie their hair up like Teddy Thomas so I would go with the head model you have. Looking great
 

Attachments

  • Screenshot (98).png
    Screenshot (98).png
    3.5 MB · Views: 18
Update to the first post: Assigning vertext groups to control face animations.

In my tutorial on the first page we went through the basics of getting a custom player face model and texture into the game. To test this model out in the tutorial I "cheated" by autorigging my custom model onto the Rugby 08 skeleton, which works fine for testing but usually creates visual issues with the in-game animations for the custom player. Here I'm going to quickly cover setting up proper vertex groups.

Left-click your model in object mode and shift-click on the skeleton. Right click to enter the context menu and then select Parent -> With Empty Goups. This will link the skeleton's vertex groups to the head model but will leave the groups empty for us to fill in manually. Select the head model and go to the object data properties sub-menu, if the previous bit worked you should see a tab for vertex groups that should be populated with vertex group indexes (Hips, Spine, Neck, Head etc.).

In edit mode we can add vertexes to each group. Highlighting vertexes on your model and clicking Assign will add those vertexes to the selected group. Remove will remove the selected vertexes from the selected group. Select will highlight on your model what vertexes are already assigned to the selected vertex group. Deselect will do the opposite of select, hides the selection of vertexes in the highlighted group. A vertex can be assigned to multiple vertex groups.

From my testing, the most important groups are Upperspine, Neck, and Head. Upperspine is where the neck animations attaches and gets "anchored" to the body of the player. Neck assigns the bits allowed to rotate on the model. Head contains everything else, it's the static bits above the neck that move together while the neck animation rotates and swivels the head (you can visualise this by moving your own head around).

You MUST make sure that all vertices are at least assigned to either Upperspine, Neck, or Head, otherwise visual glitches will occur on the model. I have also found that the neck group should share a row of vertexes with both the upperspine and Head goups, if not the player's neck looks like it's made of sillystring.

The next priority is then Jaw, LoLip, UpLip, RBrow, LBrow. These are used in-game when your player speaks and interacts with other players. There are other groups that in theory would give a greater control over these animations, but from my testing these have little or no effect. I also tend to add vertexes to Nose ad Eye groups to stop these bits moving with the mouth or eyebrows, but not 100% sure what the effect of these is.

I've made a gallery of examples of the vertex groups I've used, it's definitely something to experiment with further. Note if you've autorigged a model previously that you wish to manually rig, you will have to manually clear the groups first, I'm not sure if there's an easy way to clean up/reset an autorig.


Thanks jim - I had a go at this yesterday eve and I (think) I've got a handle on it having tested Joe Marler. Need to test a bit more to make sure facial animations are working (do we have any good way to test this? - do I have to score a load of tries with Marler? haha). It doesn't seem like too much extra time to do this vs autorigging so I think (if it seems to be working) I will aim to incorporate this step going forward. I also look to fix any previously produced models where the autorigging has cause obvious issues.

One thing I still really haven't sorted out if the neck modelling. I have the shirt model in blender and you mentioned using the extrude tool in blender but haven't managed to improve my results on that. How do you get that triangle shaped, smooth neck (for example on Nigel Owens model) - when I tried extrude it didn't seem to produce that type of shape and ended up being pretty messy. Although I'm producing head models via blender I'm still very much a blender novice. I think the upper spine rigging doesn't really matter if I don't get the neck modelling sorted out first (still looks strange/clipping through shirt and gaps)

Also for the textures what tools are you using? Again they seems to be very polished/clean looking whereas the ones I have can vary in quality a lot!
 
How do you get that triangle shaped, smooth neck
The model from Facebuilder comes with a couple of rows of unused vertices below the neck, I delete those. I select all the vertices at the bottom of the neck of the model, then extrude straight down until just inside the collar of the shirt, then extrude again further into the shirt so I now have two "extra rows", the first one is now the bottom of my neck, the second I move the vertexes around to form the top of the player's chest.

In the options for the extrude tool you can choose to fix the extrude direction in XYZ planes to make it cleaner. There's also options to mirror vertex positions through XYZ planes, which makes it easier to form the "chest" bit.

Untitled.png

Also for the textures what tools are you using?
I take the facebuilder generated texture and edit it in GIMP. The texture editing takes several hours to do, it's not a quick process. What I can see from your models is you're using a different texture mapping on the facebuilder model to me, I switch mine to use "maxface" UV mode which gives me more resolution over the face area, thus more detail. For example comparing my JD2 to your Bundee Aki:

face.png aki.png

Unfortunately it's not easy to switch between the two uv modes, unless you still have the source photos and can generate a new facebuilder texture.

Also when making the facebulder texture I find using less source photos for the texture creates a better result, too many source photos can create a messy overlapping texture.
 
The model from Facebuilder comes with a couple of rows of unused vertices below the neck, I delete those. I select all the vertices at the bottom of the neck of the model, then extrude straight down until just inside the collar of the shirt, then extrude again further into the shirt so I now have two "extra rows", the first one is now the bottom of my neck, the second I move the vertexes around to form the top of the player's chest.

In the options for the extrude tool you can choose to fix the extrude direction in XYZ planes to make it cleaner. There's also options to mirror vertex positions through XYZ planes, which makes it easier to form the "chest" bit.

View attachment 11361


I take the facebuilder generated texture and edit it in GIMP. The texture editing takes several hours to do, it's not a quick process. What I can see from your models is you're using a different texture mapping on the facebuilder model to me, I switch mine to use "maxface" UV mode which gives me more resolution over the face area, thus more detail. For example comparing my JD2 to your Bundee Aki:

View attachment 11362 View attachment 11363

Unfortunately it's not easy to switch between the two uv modes, unless you still have the source photos and can generate a new facebuilder texture.

Also when making the facebulder texture I find using less source photos for the texture creates a better result, too many source photos can create a messy overlapping texture.
Brilliant - thanks for the info on the neck modelling. I wasn't making the neck by extruding in two steps so didn't have that extra row to use for chest section which I think is key for rigging the model properly. Also will look into using the fixing the extrude direction.

For the textures recently I've being trying to make the textures very quickly as I want to focus on getting a lot of players done and then potentially refine/improve certain players later. I've been just trying to select photos that do most of leg work covering the majority of the face and then just quickly filling in the gaps with blender texture painting (you can see some fairly ropey bits of texture on that Aki model on the neck/hair). Probably a balance to find in terms of improving the quality so just trying to pick up tips on things I can do to improve the quality and I think uv mode is a good start.

I was actually using maxface initially but I remember at one point coming into a lot of issues with being unable to switch to maxface and lots of texture missing issues etc. so started sticking with butterfly simply because it was working - will have a go at switching back to maxface for the next model.
 
Can someone make all the face edits and share the zip files so we can just extract and paste directly.

Im not a tech guy

Please but a huge fan of rugby and your edits

Please
 
This is a guide to make player faces for Rugby 08 using Blender and a plugin called Facebuilder. In this rough guide I will be creating Johnny Sexton's head to use in Rugby 08. Special thanks to Dmitri who has done most of the actual work on this at this thread: https://www.therugbyforum.com/threads/otools-for-editing-o-and-fsh-files.47704/, I'm just writing down step-by-step instructions here.

Tools used:

Blender 2.83.5
Facebuilder plugin 2021.2.0 (30 day free trial)
BigGUI
FshEd with "Graphic Importer" plugin
OTools GUI 0.171
Woosah's Rugby 08 roster editor
An image editor such as Photoshop, GIMP etc.

Woosah's editor usually comes with a list of real player heads already in Rugby 08, their ID number and the file the head is stored in.

The in game models are all stored in data.gob in Rugby 08/Data/motion. Use BigGUI to access this folder and extract your file to a new folder/workspace. The .big file for a player's head contains "model.o" and "textures.fsh". Again use BigGUI to extract the model and texture to your workspace folder.

Using FshEd to open texture.fsh, for the model I'm replacing there is only a face texture linked, other models may have a seperate texture for additional objects on the model (scrum caps, seperate hair objects etc.) Extract the textures to your workspace.

Otools GUI is used to convert the data in model.o into a format that can be recognised by Blender, and later to repack our custom model to use in Rugby 08. There is more information on this tool here: https://www.therugbyforum.com/threads/otools-for-editing-o-and-fsh-files.47704/. Use OTools in "Export .o, .ord, .orl to .gltf" mode and export the model.o file. You must use the additional command -skeleton "data\skeleton\rugby\head_temp.o" to export the model with a skeleton which will be necessary for "rigging" the custom head. We may need to refer to this file later so don't combine it with your custom model's .gltf. My workspace folder now looks like this:

View attachment 10560 View attachment 10561

Now it's over to Blender. For this guide I will be using the Facebuilder plugin to generate Sexton's head model and a base texture to work on later. There's other tutorials on using the Facebuilder plugin online so I won't go into too much detail, however there are some things we can do here in advance:

Rugby 08 won't be showing us much detail on our custom object, so in the options for the plugin, under model, use the "low poly" topology. This will give us more than good enough detail in-game, it will be easier to manipulate the low-poly model later and it keeps our file sizes small. I'd also advise setting the "scale" of the head to 6.0 or 6.5, to match the head/body from Rugby 08.

Rugby 08 will expect a texture for the player's face that has dimensions that are powers of 2, ie. 128*128px, 256*256px etc. so we should make sure the texture Generated by Facebuilder is square. I find a 512*512 in Rugby 08 gives enough detail. The game will crash if the texture is an incorrect size. Also under the texture options I recommend changing the UV map mode to "maxface", to keep as much detail on our model's face texture as possible. I recommend leaving the autofill option off when texture generating as it makes the textures very blurry.

After playing around with the generator and different images of Johnny, I end up with this:

View attachment 10563
Export this generated texture to your workspace.

At this point I open up a new instance of Blender to begin working on the model from Rugby 08. Go to file/import/gltf 2.0 and import the .gltf file generated earlier. Once this is done copy the model from Facebuilder into this scene. I use the model from Rugby 08 as a guide to position the Facebuilder head, to match up where the neck, eyes, ears etc go. Once everything's roughly positioned, select the your custom head and press ctrl+A and apply all transforms. If this isn't done the head may appear in-game at the player's feet.

View attachment 10565

In the scene collection menu at the top right of Blender, shift-select the Facebuilder head, keep shift held and drag the object on top of the skeleton below, then release left-click, to make the skeleton the "parent" of the Facebuilder head.

Go into the Basehead object and copy its texture name (most likely "mat1 [LitTexture2IrradSkinSubSurfSpec,tex1:dirt]") we will need to apply this name to the texture on our custom head to get the correct lighting on the model in-game. Make sure Blender doesn't change this after renaming the texture. At this point the head from Rugby 08 can be deleted from the scene.

In the object data properties of our head, add a vertex color (click the + icon in the sub-menu), and enable "Auto smooth normals". In the material properties menu of the texture change the Specular to 0.500 and the Roughness to 1.000. Whilst here change the base color to open a "image texture" then select "face.png" from your workspace. This is the point where you must make you players new face texture. I use GIMP but any other image editor should work. One handy tool I use in Blender is the "stencil brush" mode, to paint face features from real photos directly onto the model.

View attachment 10567 View attachment 10568

Once you have a suitable texture save it in face.png, make sure it is at the correct scale for importing back into Rugby 08 (I recommend 512*512px).

Now we're going to be lazy and "cheat" merging the head model to the game skeleton. If we were being thorough we would look up some guides online for vertex/mesh rigging to a skeleton/armature. Instead we're going to have Blender give us a "best guess" of where everything attaches to the skeleton. In the scene preview, click on the head, then shift click the skeleton, then right click->"Parent"->"With automatic weights". When rigging the head this way, there is a visual error in-game when a custom player tries to talk, the whole head bubbles instead. This is something to look into in the future. At this point the model is ready to test in Rugby 08.

Export as gltf 2.0 and switch the export format to "separate" before exporting. I'd recommend exporting to a new file instead of overwriting the original model.gltf. Use OTools GUI to import the custom .gltf to model.o, using the additional command "-skeletonData none". Use FshEd to import your new face texture into textures.fsh, and save the file. Use BigGUI to import your edited model.o and textures.fsh into the .big file for your player, then rebuild the .big file and copy it into your Rugby 08 master folder.

Finally edit the roster file to apply our head model onto Sexton in-game, using Woosah's Rugby 08 editor. Using Woosah's list from earlier I assign Sexton with Face ID 6202, be careful when using the editor as it usually forgets to apply the correct body skin texture, kicking foot, and player perks to your player when editing.

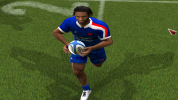
Once all this is done run Rugby 08 and check your custom model in the game:

View attachment 10569
View attachment 10570

As you can see there's a bit of further editing to be done to this model (adding the neck, fixing the texture etc.) but this was a first draft. I need to look into skeleton rigging to get the animations correct. Another one I've done:

View attachment 10571

So far I'm trying to edit players to replace others from their country, eg. Sexton over Ronan O'Gara's model, Farrell over J Wilkinson, Biggar over R Sidoli, to stop any conflicts in the future. Feel free to offer any advice/ask questions below.
Broski can I get a link to BigGUY so I can download it please
 

Latest posts

Top